Updated June 27, 2019 – 3/4″ Plywood Design Added (bottom of page)
Another very popular easy do it yourself design is the dog house made from a few 2″ X 4″ ‘s, 2″ X 6″ ‘s, one 8′ X 4’ – 1/2″ sheet of plywood, torx screws and paint. We have some houses in the yard that are 6 years old and have held up well. The only mods and improvements I’ve made to the houses is adding a 3/4″ treated plywood roof with 2″ X 4″ ‘s to hold it on vs the standard 2″ X 2″ most mushers use. The dogs jump up on the roof quite a bit and tend to knock it off from time to time. The improved design provides weight, durability, and holds it on much better. We also use 2″ X 6″ ‘s for the doors it adds a little more protection from the elements and prevents male dogs from peeing into the house.
Construction Tips
- Be consistent in the plywood cuts allowing 1/8″ for the circular saw blade
- Use construction adhesive to strengthen the assembly
- Use clamps to help hold thing together prior to screwing
- Use a square
- Work on level ground
- Use caulk on the inside edges for weather proofing
Materials Needed for 1 Dog House
- 1 – 4′ X 8′ – 1/2″ Sheet of Plywood
- 2 – 8′ – Treated 2″ X 4″ ‘s
- 2 – 8′ – construction 2″ X 4″ ‘s
- 1 – 8′ – construction 2″ X 6″ – you only need 4′ so you will have extra for another house
- 1 – 8′ – 2″ X 2″
- 2″ t-25 torx deck screws
- 3.5″ t-25 torx deck screws

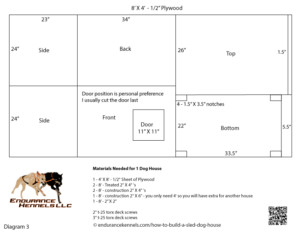
Diagram 3 – Wood Cutting Dimensions
DOWNLOAD DIAGRAM 3 – $5.99 USD
Step 1 – Make Initial Cuts
Cut the 8′ treated 2″ X 4″ ‘s in half so you have 4 – 4’ 2″ X 4″ legs. These will need to be trimmed again based upon your desired house height, 28-30″ is recommended.
Cut the plywood, see diagram 3 for measurements.
Cut the roof top 2″ X 4″ ‘s.
- 2 – 34.5″ long
- 2 – 26″ long
- Save extra for the door if you chose to not use the 2″ X 6″ ‘s for the door
Cut the inside bottom support 2″ X 2″ ‘s.
- 2 – 19″ long
- 2 – 26.5″ long
Cut the door frame.
- 2 – 11″ long
- 2 – 14″ long
Step 2 – Attach Leg 2″ X 4″ ‘s
Screw in the cut 28-30″, 4′ legs, 2 on the front sheet and 2 on the back sheet, offset to the inside by 1/2″ to allow for the sides to attach. Note the bottom sheet cutouts so you place them properly.
Step 3 – Screw the Side Sheets On
Now you have a box with no top and no bottom and 4 legs. Use a square to keep everything neat and tight while you are screwing it together.
Step 4 – Frame the Bottom
Flip the house bottom side up and screw in the 26.5″ – 2″ X 2″ ‘s allowing 1/2″ from the bottom for the bottom sheet to sit flush. Same with the 19″ – 2″ X 2″ bottom supports.
Screw in the bottom sheet.
Step 5 – Frame the Roof
Allow a tiny bit of space so you can easily get the roof on and off. Screw the 34.5″ – 2″ X 4″ ‘s on first then test the spacing by putting it on the house. It should go on easy with little or no friction. If it’s too tight now is the time to adjust the placement. Screw in the 26″ – 2″ X 4″ ‘s to the top and test again. Screw the 2″ X 4″ ‘s to each other at the end.
Step 6 – Cut Out the Door and Frame It
Screw the 11″ and 14″ door frame together. Cut out the 11″ X 11″ door noting the placement of the leg allow at least 4.5 inches from the side. Screw the door frame to the front from the inside of the dog house.
That’s it!
I would suggest two good coats of paint and high traffic deck paint on the roof. Three coats of a good polyurethane on the inside will also extend the life of your doghouse.
See Our Other Dog House Designs
One Sheet of 3/4″ Plywood
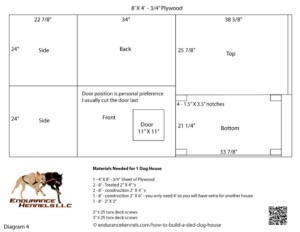
With slight modifications to your measurements, a 3/4″ plywood dog house will be significantly more durable. I prefer this version over the 1/2″ as the house will last the entire lifetime of the dog or longer if you maintain it properly and keep it clean and sealed. To make them even more durable you can use pressure treated lumber too. Despite what some people may say, AC2 pressure treated lumber is absolutely safe for you dog. I’ve had dogs completely chew apart and eat pressure treated houses and were never affected.
Use the same construction process as above to make a stronger, more insulated, and longer lasting dog house.

Diagram 4 – Wood Cutting Dimensions


You must be logged in to post a comment.